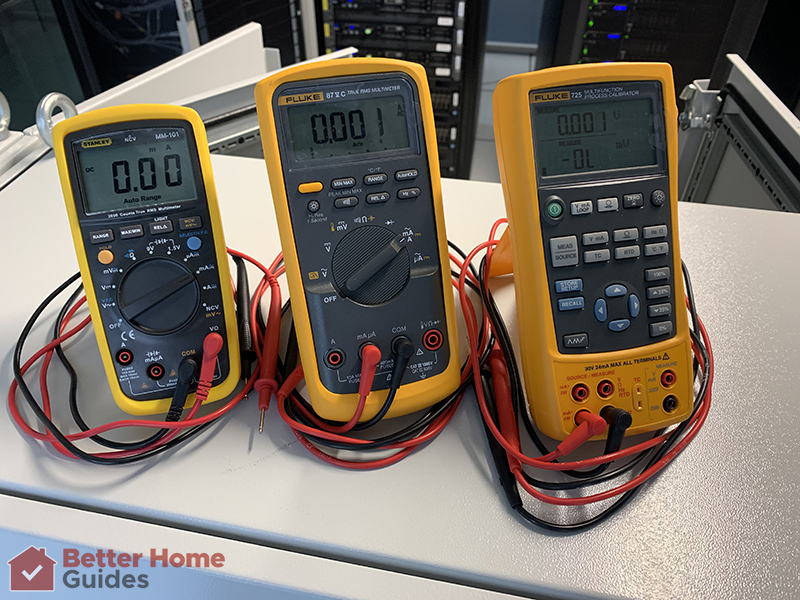
A digital multimeter (DMM) is an essential testing tool for any electrical project.
A basic DMM combines the tasks of measuring the 3 fundamental electrical properties for a given component/circuit, Voltage (Volts), Current (Amps), & Resistance (Ohms).
Although a multimeter has the capability to measure all 3 of these parameters, a DMM might still be heard referred to as a “Voltmeter”, “Ammeter”, or “Ohmmeter”.
This is, in large part, due to single task analog meters having been so common before digital technology made it easier/more economical to combine tasks into one multi-functional tool.
There are also numerous models which offer additional features and advanced options. From cars to computers to household appliances, the multimeter is a seriously powerful tool any handyman should have in his/her arsenal to combat faulty electronics and electrical power issues. Whether you are a professional electrician, technician, engineer, or just a DIY kind of person, you can find a DMM model with the specific features you’re looking for to meet your testing needs.
In this article, I will provide in-depth reviews for some of the best modern multimeters available, as well as provide an in-depth buying guide at the bottom of the page here to help you understand the features and functions you should be looking for to meet your needs. I will cover what a multimeter does, how they work, how to use, and show you the best deals on the most modern and up to date multimeters. I’ll do my best to make this an all-encompassing “one stop shop”, so buckle up and let’s get started!
What's in this Guide?
- Here Are The Best Multimeters
- 1. Fluke 87-V True RMS Digital Multimeter (Best Overall)
- 2. KAIWEETS Digital Multimeter True-RMS Digital Multimeter (Budget Pick)
- 3. Fluke 115 Compact True-RMS Digital Multimeter (Best Value)
- 4. FLIR DM166 Industrial Thermal Imaging Multimeter (Best Thermal Imaging)
- 5. Fluke 88V (Best Automotive Multimeter)
- 6. Fluke 1AC II VoltAlert Non-contact Voltage Tester
- 7. Fluke 1577 Insulation multimeter
- 8. INNOVA 3320 (Best Under $20)
- 9. Klein Tools MM6000 Electrician’s HVAC TRMS Multimeter
- 10. Southwire Tools & Equipment 14090T TechnicianPRO
- 11. Fieldpiece LT17AW Digital Multimeter
- 12. Fluke 101 Basic Digital Multimeter (Best Under $50)
- 13. Craftsman 34-82141 Digital Multimeter
- 14. AstroAI Digital Multimeter
- Multimeter Buying Guide
Here Are The Best Multimeters
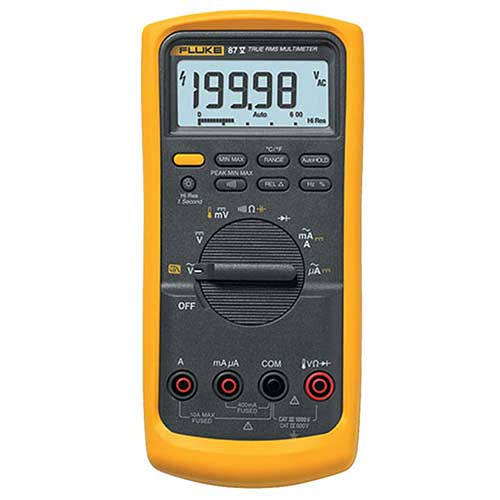
1. Fluke 87-V True RMS Digital Multimeter (Best Overall)
| Estimated Price | $550 |
| Dimensions | 9.75 x 6.25 x 3.5 inches |
| Measurement Type | Multimeter |
My Review: For most applications concerning any electrician, engineer, technician, or at-home DIYer, the Fluke 87-V True RMS digital multimeter is my choice for best digital multimeter overall and could easily be discussed as the best value choice as well. As an electrical engineer by profession, this is the model I and the rest of my engineering colleagues in our testing labs use, as well as the technicians who work on our shop floor.
As professionals in a design and manufacturing environment, we choose to use the Fluke because they offer a superior product for the essential tasks we perform on a daily basis, backed with a lifetime warranty. Reliability, durability, precision, and at a price point that is tough to beat.
What I Liked About It: Many of the products I work with, in my industry, are electronics housed in steel enclosures, so the Fluke magnet hanger is perfect for me, as well as an electrician, HVAC professional, etc. who would benefit from having both hands free to work in areas without a table or surface area available.
I have traveled the world with a Fluke 87-V providing engineering support, testing, troubleshooting, and training technicians both domestic and international. It has an excellent display, a plethora of optional accessories, takes reliable and precise measurements, and is intuitively designed with every feature you would ever need, short of some very specialized functionality that would require a much more specialized device.
What I Didn’t Like About It: Although this is my pick for the best DMM overall if I had to choose one thing to about this meter is that it’s not the most compact model on the list. If you’re just looking to do simple tasks such as continuity checks and quick voltage checks you could check out a Fluke 101 or 115 model below which will be a much smaller meter. The 87-V is an incredible meter with precision accuracy, higher current rating, frequency measuring, etc, but if these features happen to be a bit overkill for your needs then there are models that come in a more portable design with equally high build quality reviewed below in this article.
Key Features:
- True RMS for higher accuracy on AC
- Measures 20 A for 30 seconds momentary, 10 A continuous
- Accurately measure frequency of VFD, ASD
[su_youtube url=”https://youtu.be/TIu6mDk5SI0″ responsive=”yes” autoplay=”no” title=”FLUKE 87 V True RMS Multimeter Review”]
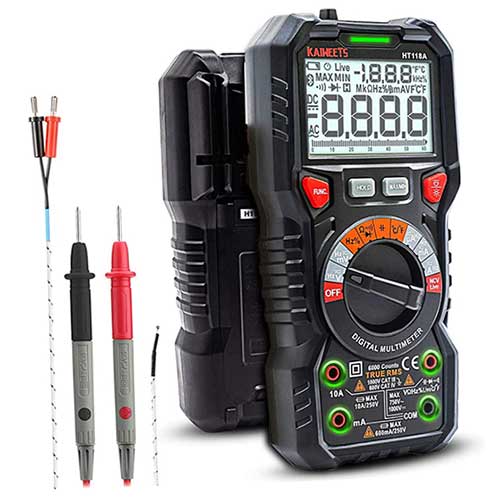
2. KAIWEETS Digital Multimeter True-RMS Digital Multimeter (Budget Pick)
| Estimated Price | $42 |
| Dimensions | 7.48 x 3.54 x 2.17 inches |
| Measurement Type | Multimeter, Voltmeter |
My Review: If you don’t want to ante up hundreds of dollars for a Fluke and want a more budget-friendly option, but still want a solid DMM with nice features to keep around the house, garage, or office for taking basic measurements, check out this KAIWEETS DMM. It’s a best seller for good reason. The bottom line is you will not be getting quite the quality in build and functionality we’ve come to expect from brands like Fluke, Klein, and others, but that’s ok! If you’re not going to be needing a professional level meter and using it every day, then the affordable price point on this model will make it a great budget pick for someone needing to make hobby level, DIY, or at home troubleshooting level measurements.
What I Liked About It: It’s impossible to not love the price point on this one, which made this a natural winner for my best cheap DMM category. I love that, although this multimeter comes at a budget price, it doesn’t come up short on features and functions.
This model is easy to operate and has all the functionality you’d expect plus some other cool and useful features such as non-contact voltage testing, Live function with both a sound and light indicator alarm, Auto-ranging, Low battery indicator prompt, Data retention, and more. One that I like when I was personally using this meter was when I was testing a live wire, the screen color changes to red to indicate this detection. It also had a built-in LED flashlight on the back which I found very useful, as I was taking my measurement inside an enclosure.
What I Didn’t Like About It: Sometimes you get what you pay for, and we could definitely feel the difference in build quality between this meter and bigger name brands we tested like Fluke. This DMM would be great for an engineering student looking for something to use for educational purposes or for small tasks around the house. I would recommend a more rigid designed multimeter if you are needing to use it in a professional capacity and in environments that are harsher on your tools.
Key Features:
- DC Voltage Accuracy: 0.1%
- Measures 20 A for 30 seconds momentary, 10 A continuous
- Accurately measure frequency of VFD, ASD
[su_youtube url=”https://youtu.be/hMG_XXmpwcE” responsive=”yes” autoplay=”no” title=”Kaiweets HT118A Digital Multimeter Review”]
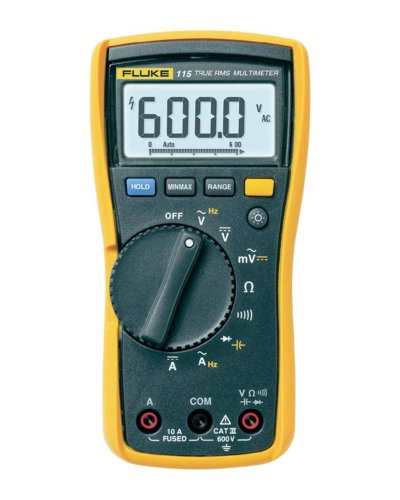
3. Fluke 115 Compact True-RMS Digital Multimeter (Best Value)
| Estimated Price | $250 |
| Dimensions | 6.57 x 1.82 x 3.31 |
| Measurement Type | Multimeter |
My Review: Of course, Fluke makes the list again and it won’t be the last time either so stay tuned. The Fluke 115 is purpose-built to offer a fully functional multimeter in the most compact form factor possible. It’s got incredible durability and can operate in extreme temperatures thanks to extra internal insulation. Of course, at this price, it’s got a backlit LCD display and a little kickstand that feels pretty hefty and durable. The Fluke 115 is a true-RMS device for incredibly accurate measurements on non-linear loads. It’s rated at CAT III 600V and is also capable of measuring 20A.
What I Liked About It: Although I love my Fluke 87-V, I’ve found I really like the more compact dimensions of the 115 at times. As with most Fluke devices, this one is fully capable of measuring continuity, frequency, diode testing, and capacitance, making the Fluke 115 an awesome value DMM. I love that I’m getting a top-quality brand in Fluke, loaded with all the fundamental multimeter functionality needed for most applications, in a very conveniently sized design, for half the cost of other top-quality models. I consider this a perfect option for a field technician or any professional that travels with their tools and may benefit from a lightweight form factor. I find this to be one of the best value options for anyone who wants a great multimeter built to last.
What I Didn’t Like About It: While I found the compact design of this DMM very appealing for portability, this meter does lack some of the functionality of higher-end fluke models.
Key Features:
- TrueRMS for higher accuracy on AC
- Measures 20 A for 30 seconds momentary, 10 A continuous
- Large LED backlight
[su_youtube url=”https://youtu.be/jV6Th7Hvj8I” responsive=”yes” autoplay=”no” title=”Know your way around a Fluke 115″]
4. FLIR DM166 Industrial Thermal Imaging Multimeter (Best Thermal Imaging)
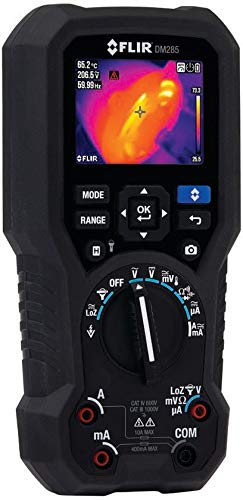
| Estimated Price | $330 |
| Dimensions | 3.4 x 1.9 x 7.5 |
| Measurement Type | Multimeter, Thermal Imaging |
My Review: Okay, so this is probably overkill for 99.9% of our readers here, as it’s capable of thermal imaging, wireless connectivity, data logging, and implements the FLIR InSite professional work tool management software.
What I Liked About It: The thermal imaging, obviously, so let’s touch on that. Why would you even want thermal imaging on a multimeter to begin with? Using FLIR technology, you’ll be able to scan for system components exceeding their thermal ratings. I love this functionality as it instantly alerts you to failing components on major pieces of equipment. These are often used on technology and equipment that costs hundreds of thousands of dollars, so I’d say companies certainly don’t mind outfitting their techs with a multimeter that only costs around $340.
Key Features:
- 18 function DMM, includes VFD mode, True RMS, LoZ, NCV, built‐in work light, and a laser pointer
- Onboard data storage for both electrical data and thermal images
- Wirelessly connect to the FLIR InSITE professional workflow management tool
[su_youtube url=”https://youtu.be/YtR9itdFYQ0″ responsive=”yes” autoplay=”no” title=”Introducing the FLIR DM166 Imaging True RMS Multimeter”]
5. Fluke 88V (Best Automotive Multimeter)
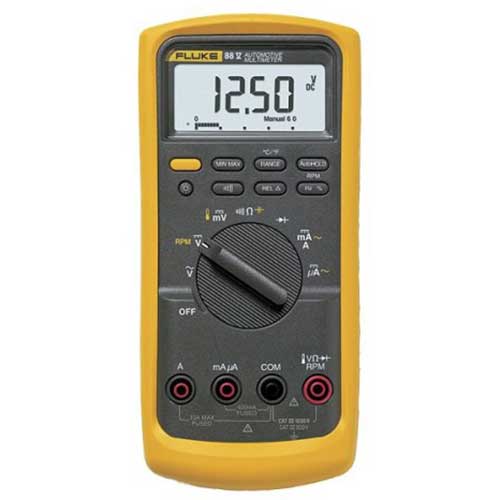
| Estimated Price | $560 |
| Dimensions | 9.75 x 6.25 x 3.5 inches |
| Measurement Type | Multimeter |
Price Range: Under $450
My Review: The Fluke 87V and 88V have many similarities. The key difference between the two is that the 87V is a True-RMS DMM whereas the 88V is optimized with functionality specifically for automotive measurements.
What I Liked About It: I was happy to see Fluke take their 87V model and upgrade specific features that are critical to professionals in the auto industry. The 88V has a higher accuracy rating for measuring basic DC Voltage at 0.1% whereas the 87V has an accuracy of 0.5%. The 88V also includes an optional inductive pickup, that would allow a mechanic to make RPM measurements, and has the ability to perform millisecond accuracy pulse width measurements needed for measuring the pulse width of fuel injectors. I feel like fluke knocked this one out of the park and came up with a design that I consider one of the best automotive DMMs on the market.
Key Features:
- DC Voltage Accuracy: 0.1%
- Measures 20 A for 30 seconds momentary, 10 A continuous
- Accurately measure frequency of VFD, ASD
[su_youtube url=”https://youtu.be/rZUOAQJHi7w” responsive=”yes” autoplay=”no” title=”Fluke 88V Automotive Multimeter Demo”]
6. Fluke 1AC II VoltAlert Non-contact Voltage
Tester
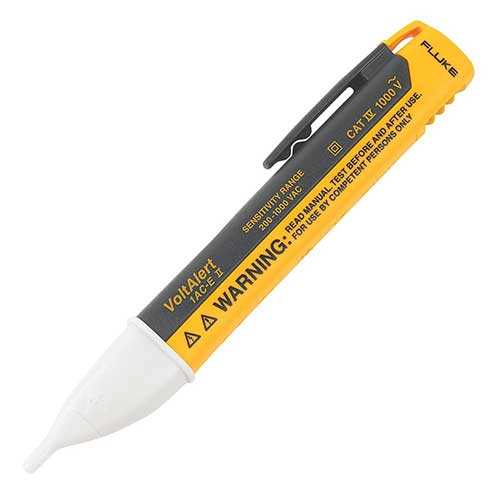
| Estimated Price | $40 |
| Dimensions | 10.2 x 3 x 1.5 inches |
| Measurement Type | Multimeter |
My Review: I know what you’re thinking. No, this is not a multimeter. But if you found this page it’s possible that a non-contact voltage tester is actually the handy little tool you’re looking for. It uses a magnetic sensor to determine if a cable or outlet jack is hot. There is not display for measurement readouts, but it is an inexpensive and quite easy to use way to ensure equipment is de-energized before you begin working on it. For that specific application, a non-contact voltage tester is a more convenient and efficient tool to use than a DMM. Just be sure to test both sides of the loop as it will only detect the hot side. As you can imagine, there are many acceptable manufacturers for this product. I stuck with Fluke as my top choice. You get the quality brand name that stands behind their equipment for the lifetime you own it and has thousands of positive ratings from satisfied users, making it an excellent choice if a voltage tester is the type of tool you need or if you decide to add to your tool bag to go along with your new DMM. I know that’s what I would do!
Key Features:
- Range: 90V to 1000V
- Batteries: 2 AAA (included)
- Red light and Beep sound indicator
[su_youtube url=”https://youtu.be/hYEo8gqw0pc” responsive=”yes” autoplay=”no” title=”Fluke 1AC II VoltAlert – Non Contact Tester”]
7. Fluke 1577 Insulation multimeter

| Estimated Price | $810 |
| Dimensions | 1.97 x 3.94 x 7.99 inches |
| Measurement Type | Multimeter |
My Review: I told you, Fluke was going to make another appearance and here she is! This thing is an absolute monster. Basically, take all the cool features from all of the other multimeters we’ve talked about here and shove them all into one multimeter with the added bonus of insulation features.
What I Liked About It: Not only is it jam-packed with tons of features, its IP40 rated and is capable of surviving 10ft drops. This unit is safety rated at CAT IV and is capable of measuring upwards of 1000V in both AC and DC and up to 60 milliamps. It’s a downright monster of a multimeter, you won’t be disappointed!
Key Features:
- Insulation Test Voltages 500V, 1000V
- Live circuit detection prevents insulation test for voltages over 30V
- True RMS, provides accurate readings when measuring linear or nonlinear loads
[su_youtube url=”https://youtu.be/Zde8tkL7AYw” responsive=”yes” autoplay=”no” title=”Review Fluke 1587 Insulation Multimeter”]
8. INNOVA 3320 (Best Under $20)

| Estimated Price | $30 |
| Dimensions | 2 x 10 x 5 inches |
| Measurement Type | Multimeter |
Price Range: Under $20
My Review: This little $20 gadget packs a surprising amount of punch in a nifty little form factor I’ve grown to appreciate. This is by far one of the best budget multimeters on the market today, I highly recommend buying one, or maybe even two, and having them in the car, on the boat, in the camper, or wherever you may need them!
What I Liked About It: I found that the auto-ranging admittedly, isn’t great, as it does struggle to keep up with fast fluctuations, but it is good enough to make ya lazy on easy projects! As far as general functionality, I’d say the thing has everything basic to get you started and some, including color-coded LEDs, a little kickstand, and rubber drop guards.
Key Features:
- Auto-ranging
- Large digital display with color coded LED’s
- Drop protection corner guards
[su_youtube url=”https://youtu.be/JSqu6hi3gbA” responsive=”yes” autoplay=”no” title=”INNOVA 3320 Auto-Ranging Digital Multimeter”]
9. Klein Tools MM6000 Electrician’s HVAC TRMS Multimeter
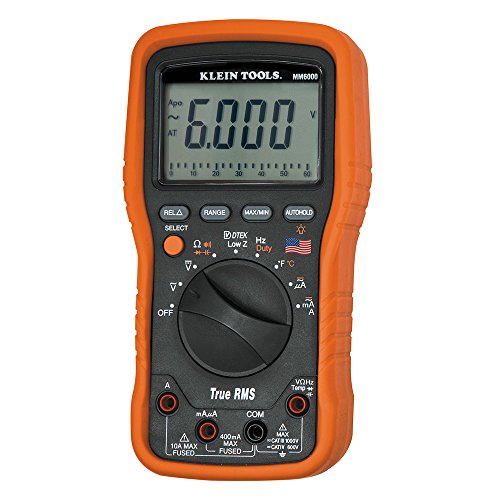
| Estimated Price | $270 |
| Dimensions | 8.5 x 6.75 x 2.5 inches |
| Measurement Type | Multimeter |
My Review: With a CAT IV safety rating, a DC accuracy of 0.2%, a super bright backlit LCD, and all the testing you’d ever need, the Klein Tools MM6000 is ready to rock and roll for any HVAC professional or electrician’s needs. It can also test flame sensors and offers analog bar graphs for fluctuating readings. As an added bonus, this device is made with the finest components sourced from South Korea (known to be a leader in these type of components) and hand-assembled right here in the USA. Did I mention it’s one of the best auto-ranging multimeters on the market today with an auto shut-off feature? Klein Tools is a brand many electricians and automotive technicians know and trust, pick one of these up and you won’t regret it. Oh, and it most certainly lives up to its 10ft drop endurance rating!
What I Liked About It: The first thing I noticed when pickup up this Klein Multimeter was the build quality. It feels rigid and the parts look and feel of great quality. This thing is built to last and will likely be something you hand down to your kids that will still be relevant and powerful.
Key Features:
- CAT IV safety rating
- Basic DC accuracy of 0.2%
- Comes with test leads, batteries, thermocouple, carrying case
[su_youtube url=”https://youtu.be/r9vJaIP2i_g” responsive=”yes” autoplay=”no” title=”Klein Tools MM5000 and MM6000 Multimeters”]
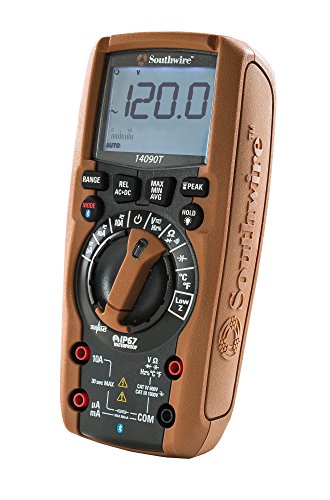
10. Southwire Tools & Equipment 14090T TechnicianPRO
| Estimated Price | $180 |
| Dimensions | 3.11 x 1.99 x 6.6 inches |
| Measurement Type | Multimeter |
My Review: Oh boy, where to get started with this one. The first thing you’ll notice is that it’s heavy and feels incredibly durable. This thing feels like it’s ready to go to war, or at least withstand several years of field abuse. The Southwire 14090T multimeter is is CAT IV rated and IP67 waterproof which is awfully nice for those of you working outside.
Moving on from the mobile app integration, this multimeter also encompasses leading-edge Low Z technology, which eliminates false ghost voltage readings and is capable of extreme accuracy when measuring AC. As a final note, the backlighting LCD is not only incredibly durable but is also very bright and very easy to use in complete darkness. This is a technician’s best friend and a multimeter designed to last the duration of your career.
What I Liked About It: Something that really stands out about this particular unit is its mobile app integration. I love having the ability to upload data to my smartphone and compile the data in one easy to use place. This is especially useful for people, like myself, that have multiple job sites and many readings to keep track of. The app will track all of your data and even geotag it with GPS, ensuring you never get data from two job sites mixed up.
Key Features:
- TrueRMS for higher accuracy on AC
- Wireless interface for downloading, viewing, and sharing readings
- IP67 rated and durable build
[su_youtube url=”https://youtu.be/mpUdbjO693g” responsive=”yes” autoplay=”no” title=”TechnicianPRO™ Multimeters”]
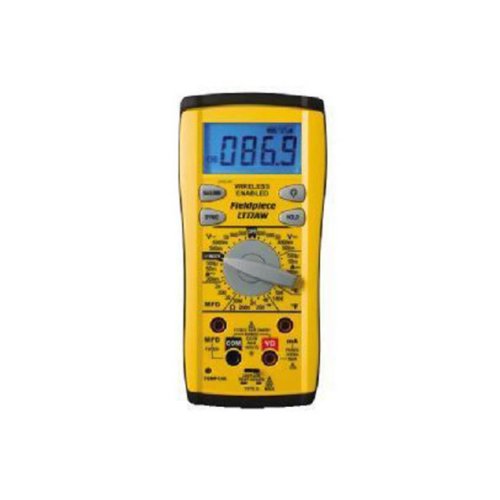
11. Fieldpiece LT17AW Digital Multimeter
| Estimated Price | $200 |
| Dimensions | 6.5 x 3 x 9.5 inches |
| Measurement Type | Multimeter |
My Review: Fieldpiece is a well-known mid-tier brand and has brought us a truly fantastic multimeter at a ridiculously low price. If you aren’t familiar with Fieldpiece products, you’ll be delighted to know about how their entire accessory line can transmit data wirelessly which makes compiling data from multiple job areas a breeze. This multimeter includes a magnetic hander, a super bright backlit LCD, a kickstand, a very durable body, and can test continuity, capacitance, temperature, and Microamps DC. This is probably the top of the line for what most people would require.
What I Liked About It: Short of Industry-specific features this model does everything I would likely ever need it to. Everything past here is going to implement specialized features for specific jobs only a professional or hardcore handyman might require.
Key Features:
- Includes wireless transmitter & can be used directly or wirelessly
- Continuity indicator, capacitance, temperature, microamps DC
- Rugged ABS case with rubber boot fits naturally in the hand
[su_youtube url=”https://youtu.be/mIWlWjbHcSE” responsive=”yes” autoplay=”no” title=”FieldPiece LT17AW Wireless Digital Multimeter”]
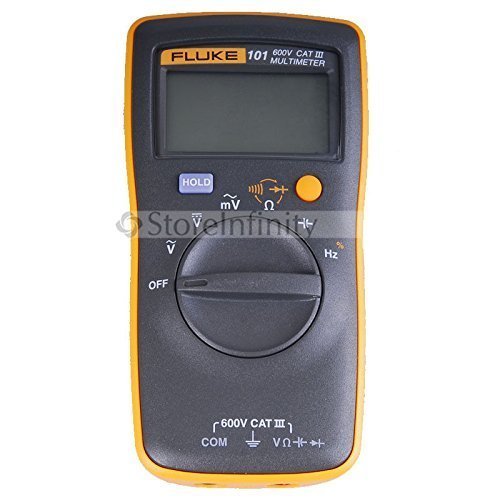
12. Fluke 101 Basic Digital Multimeter (Best Under $50)
| Estimated Price | $70 |
| Dimensions | 5.12 x 1.06 x 2.56 inches |
| Measurement Type | Multimeter |
My Review: Fluke is an ironic name… THE name in the world of multimeters today. Fluke has multimeters for every price range and it’s no surprise they took the top spot in our best overall and best value category. The 101 Basic multimeter is purpose-built to be portable and carriable in your pocket. It is another strong Best Budget contender. It’s CAT III 600V rated and comes equipped with the ability to test continuity and diodes. It’s got a nice rugged anti-slip design that fits in the palm of your hand comfortably.
What I Liked About It: While It will only provide basic functions compared to other Fluke meters, I really like this compact model for under $70! It’s incredibly small and lightweight and offers all the standard features you’d need for basic testing! It has an auto shut-off feature that I’m a big fan of. All in all, this is a steal at $70 and will blow away any other multimeters on a tight budget.
Key Features:
- Diode and continuity test with buzzer
- Automatic shutdown, Battery is easy to replace
- Small lightweight design for pocket portability and one-hand use
[su_youtube url=”https://youtu.be/JMbHilqHoI4″ responsive=”yes” autoplay=”no” title=”Fluke 101 review pocket size multimeter”]
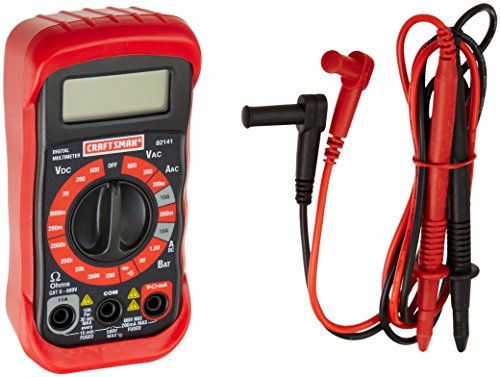
13. Craftsman 34-82141 Digital Multimeter
| Estimated Price | $25 |
| Dimensions | 5.49 x 2.64 x 1.75 inches |
| Measurement Type | Multimeter |
My Review: Oooh I just love Craftsman. I’ve been using Craftsman tools since I could walk and although some people send them a lot of hate, I’ve always been fairly impressed with the quality and value they provide. Of course, this isn’t the best multimeter, far from it actually, but it is insanely cheap while still offering everything you need on a basic troubleshooting level. It can measure up to 600 Volts and up to 10 A both AC and DC which a lot of meters in this price range fail to do.
What I Liked About It: All in all, it’s one of the best budget-friendly options I’ve used and it will definitely serve you well. As a bonus, it comes with a plastic kickstand. Not exactly the most stable or durable, but hey, it works and it’s under 25 bucks!
Key Features:
- Measures up to 600V and up to 10A
- Audible tone to test for proper wiring and short circuits
- Diode test functionality
[su_youtube url=”https://youtu.be/diHqiw_i3uA” responsive=”yes” autoplay=”no” title=”Craftsman 8 function digital multimeter Voltmeter Unboxing and Testing”]
14. AstroAI Digital Multimeter
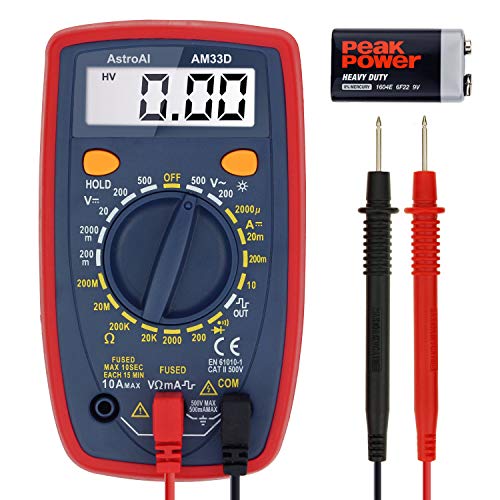
| Estimated Price | $17 |
| Dimensions | 5.1 x 2.8 x 1.4 inches |
| Measurement Type | Multimeter |
My Review: For 10 bucks, this little unit is a great starting point for those of you who haven’t ever used a multimeter. This model is perfect for troubleshooting automotive or household electrical issues. Easy to use and has the ability to measure voltage, current, resistance, as well as check continuity. It can also test transistors and diodes. As a quick little note, you cannot use this meter to measure AC current, only DC current can be measured with this model.
What I Liked About It: The AstroAI multimeter is as bare bones as it gets, but sometimes that’s all you need! I like that it does have a sampling speed of 2 seconds which isn’t bad and includes basic overload protection. As for the unit as a whole, it’s not fancy, but it works and it’s cheap! I don’t think you can go wrong with this one. If you’re worried its too “cheap” and won’t last, I found they even offer a 1-year warranty. Not bad!
Key Features:
- Sample speed of 2 times per second
- Data hold and digital display with backlit LCD
- Easy to use and Low Price Point
[su_youtube url=”https://youtu.be/EIl0R2S7608″ responsive=”yes” autoplay=”no” title=”AstroAI AM33D”]
Multimeter Buying Guide
What is a Multimeter?
A multimeter is a small electronic device that consolidates, into a single unit, the task of measuring volts, resistance, and electrical current (or lack thereof). When speaking about multimeters, we need to identify whether the specific unit in question is either a digital or analog multimeter. The differences are subtle and they both do essentially the same job but they do encompass a bit of a different strategy in how they display their information, which is their primary difference.
Analog meter:
An analog meter will provide a scale reading with a deflection pointer (a physical moving needle points to the measured value on a paper scale). These don’t have fancy screens but rather a glass panel with a sheet of data behind them. Not as common anymore as digital multimeters, these are still used by those oldskool electronic guru’s and are sometimes preferred due to their ability to monitor rapidly varying measurements.
Digital meter:
A digital meter provides you with a reading in numeric form which appears on a screen such as an LCD. It does this by utilizing an analog-to-digital converter (ADC) which is an electronic system that, as its name suggests, converts the incoming analog signal into a digital signal which can then be processed and displayed in numeric form on the output on the meter screen and eliminating the need to decipher a needle and a graph. These are far more common than analog multimeters nowadays as there is a much better selection of options/features and a wide price range that can generally offer better value for what you need, all while typically providing higher levels of accuracy.
Both analog and digital meters will be functionally usable for much of the same application. Personal preference and perhaps prior familiarity can end up being your deciding factor, but in this article, I will be focusing strictly on Digital multimeter reviews.
History of Multimeters
Before the handy dandy multimeter came into existence, there was the galvanometer which was introduced around the 1820s. They measured voltage and resistance by using a Wheatstone bridge, which works by balancing two legs of a bridge circuit, one being placed on the unknown electrical component.
These devices, although fairly accurate, were incredibly slow and difficult to use in fieldwork. They were specially calibrated and although bulky in nature, were very fragile and delicate. The slightest unfortunate bump could ruin the accuracy of the device so it was tough to carry it around in your run of the mill tool bag/box.
In the 1920s, when having electronic devices became a reality for a lot of people and radios became the cool thing to have, multimeters were born as a result of Donald Macadie. Those pesky vacuum tube electronics were always malfunctioning and required special attention to seek and alleviate its electronic malfunctioning components. Donald was frustrated with having to carry and use multiple different tools to track down said faulty components and he decided to name his nifty new device the “Avometer”.
The Avometer used a mobile coil meter, precision voltage resistors, and switches to select specific ranges, giving this meter unparalleled power in an array of situations that hadn’t been available in one single unit before.
Eventually, in 1923, The Automatic Coil Winder and Electrical Company, or ACWEECO for short, was the first company to fully embrace Mr. Macadie’s invention and begin mass producing the units. From there on, the multimeter sustained small and incremental improvements until they became the devices we have today. His invention truly changed the lives of every electrician, handyman, engineer, mechanic, and hobbyist who has ever worked with electronics.
How Does a Multimeter Work?
Today’s multimeters include a wide array of testing solutions that include multirange DC voltmeters, multirange AC voltmeters, multirange ammeter, and multirange ohmmeters.
The inner workings of multimeters are fairly complex to those who don’t have prior experience in electrical components but lucky for us, you don’t need to hold an electrical engineering degree to use one! If you aren’t interested in the serious nitty-gritty behind these awesome little units, Wikipedia has a great write up on how multimeters work under its “operation” section.
For the quick and dirty explanation, I’ll lay out a few of the features you’ll likely use on a multimeter. Most, if not all multimeters have three distinct parts: A display, selection knob or switch, and at least two ports where wired probes are connected to them.
The display on most multimeters on the market today typically readout in four digits and are capable of measuring in positive or negative units. The fancy multimeters have a handy dandy backlit display, making for the readout display usable in low light situations.
The selection knob is used to choose what the multimeter will measure. For example, you’ll typically find ranges measurements in milliamps (mA), voltage (V), and resistance (Ω). Each of the selections available is to measure in a specified range. For example, setting the selector knob to the 20V setting will give you a readout between 2 and 19.99. If you receive just a 1, you might be testing a current that is too powerful for the specified range, thus requiring you to select a higher range to find the information you need.
The wired probes connected via the ports on your multimeter consist of metal prongs and are used to make contact with the electrical components/circuit you are testing. Although the color-coded wires are for organization purposes and the meter will work with them in either order, it can be important to use the colors in the proper port each time to avoid confusion. The black wire is almost universally accepted (at least within the U.S.A) as the ground wire and is marked (-). The red wire is conventionally plugged into the other port, which should be marked as something such as mA, V, Ω, or (+). Depending on the model of your DMM there could be several ports on the front of your meter which you will need to plug your probes into the appropriate configuration depending on the parameter you are needing to measure. One common example of this is measuring current. Setting your meter to measure electrical current (A or mA or uA) will typically require a different probe configuration than measuring a Voltage (V or mV) or a resistance (Ω, mΩ, uΩ). This is due to HOW your meter goes about doing its job. When measuring a Voltage or Resistance, your meter typically needs to be in parallel with the component you are measuring (If interested, read here for more on parallel components). When measuring electrical current, your meter typically needs to be configured within the circuit in series with the portion of the circuit you are measuring (If interested, read here for more on in-series components) By failing to measure current by placing the meter in series with the circuit, you risk blowing the internal fuse of the meter.
Your multimeter may have a port labeled something such as “10A”, which is to be used when measuring unusually high currents exceeding 200mA.
If you lose or damage one of the wired probes you do not need to purchase a new multimeter. Any probe with a “banana plug” can be used on your multimeter and they can be found cheaply in most electronic department stores or on Amazon.
There is also a wide range of different probes that you can use for different applications. For example, if a project you’re working on requires the attention of more than two hands, and you’re a normal two-handed human being, you can use probes that utilize alligator clamps to keep those suckers in a place like the Elenco Electronics TL-16 Banana to Large Alligator Test Lead Set.
You can also find probes that include tweezer clips to test SMT / SMD components such as the AST Labs SMD Tweezer Clip Test Meter Probe.
Some probes also come with IC hooks such as the Davitu 1pair Airplane Test Hook & Connector Wire Multimeter Lead Wire Kit.
The ammeter function measures the number of electrons passing a given point over a specified period of time, which is measured as a current. The units this measurement is displayed in will be given as amperes. This allows the user to identify electronics that are overdrawing current and likely to cause circuit breakers to trip.
The ohmmeter function is used to measure electrical resistance. This resistance is referring to the opposition in electrical current and is measured in ohms. You can identify a short-circuit by measuring 0 ohms and sometimes a unit near 0 will also indicate a short-circuit. When a circuit is open, the meter should read infinite resistance and no current flow.
You can measure voltage in either direct current (DC) or alternating current (AC). In regards to a typical household outlet found in the USA, the outlet is most likely using AC, however, this can vary in some countries prefer using DC.
Safety
When testing voltages and currents in your house, it is important to exercise extreme caution. You can really ruin your day, or your life, depending on how high the current it is.
Usually, you’ll be checking AC in regards to an outlet, switch, or light acting oddly and if you are new to working with electrical circuits, I advise contacting a professional to handle this for you.
If you are comfortable doing the work on your own, please use all safe electrical work practices as well as personal protective equipment (PPE)
Measuring Resistance
Set the multimeter to the 20kΩ setting and let’s get started! Press the probes against the resistor legs and apply light pressure, ensuring good consistent contact on each side of the resistor. Your meter should show either 0.00, 1, or the actual resistance value. If it reads 1 or displays OL, it’s being overloaded and will require a higher mode. If it reads 0.00 or something really close to 0.00, you’ll need to use a lower range of measurement. If you see a reasonable number between 0.00 and 1, you’ll be seeing the correct resistance data for that resistor.
If you know the resistance already but you’re simply testing it to practice or confirm its resistance, keep in mind that most resistor manufacturers create these tiny electronic components with a 5% tolerance gap, meaning the rating can be 5% in either direction. Resistors are also typically color-coded so you can use the resistance color code to determine its resistance by using this chart: Resistor Color Code
As a final tidbit regarding resistor measurements, keep in mind that measuring a resistor installed on a circuit board may greatly impact the measurement you receive due to other components drawing on the resistor itself. You can learn more about measuring resistance with a multimeter here.
Measuring Current
To measure current, you’ll need to physically input your meter into the line parallel with the existing components by using your probes on the ground of the device and its voltage common collector (VCC). Pull out the VCC wire leading to the resistor and add a wire where that wire was connected. Then use your probes on the power pin from the power supply to the resistor. You’ll be breaking the power to the circuit and in turn adding your meter to the line.
After you’ve done this, it becomes a matter of finding the correct setting on your multimeter. Remember, we’re measuring current in mA, so set the multimeter to 200mA and work from that position. If you suspect the current to be higher than 200mA, you may want to use the 10A port on your meter, otherwise risking blowing a fuse.
Note that you may want to use alligator clips as you should observe the measurements over a period of several seconds or even several minutes. The meter can’t deliver a specific number but more of an average over time, so the reading should fluctuate a bit.
Pro tip: when you’ve finished reading your necessary measurements for current, return the multimeters selector knob to read voltage. If you leave the multimeter in current mode while attempting to measure voltage, you’ll likely overload the meter and blow the fuse.
Testing Continuity
Usually, you’ll want to do a continuity check to determine if two points are connected. Continuity simply means there is resistance between two specified points. If the points in question are connected, the multimeter should emit a tone, and if they are not, leaving the circuit open, there should be no tone emitted.
To set your multimeter to check continuity, turn the selection knob until it indicates the symbol that looks like the WIFI strength symbol turned on its side. Some multimeters may have a different symbol so you may just need to consult with its user manual.
Now that you’ve selected continuity mode, press the probes together. You should receive an audible notification through some kind of tone. Turn off the electrical system first and then use the probes on the two separate ground pins. You should hear the tone.
Next, use the probes on the VCC pin and on a microcontroller to VCC on your power supply (PSU). A tone should be audible, indicating power is capable of flowing from the VCC pin to the controller. If there is no tone, you’ll know there is an issue with the connection and you’ll need to inspect the copper power lines for breaks or identify any loose wires.
Pro tip: some systems can contain residual power due to the extra capacitance which may set off your multimeters tone for a super quick moment. Ignore that and focus on the tones they are strong and lengthy.
Testing continuity is an essential method in troubleshooting and testing if two SMD pins are touching that otherwise shouldn’t be. You can use this as an integrity check before fully powering on a new system.
Need more help? Check out the How to page on Fluke’s website about How to test for continuity.
Blown Multimeter Fuse
Now you’ve done blown up your device and you’ll have to buy a brand new one!
Just kidding, your multimeters come equipped with a safety fuse that will blow, protecting your multimeters internals from catastrophic failure if you accidentally use it on the incorrect settings. Replacing the fuse is something you’ll likely need to get used to if you’re brand new to the world of testing and troubleshooting electronics. Accidents happen and this stuff is difficult!
Replacing the fuse will cost roughly $1 and about five minutes of your time. Grab a screwdriver that will fit and remove the backplate (sometimes on the front or the side) from your multimeter. Next, yank out the battery and set everything loose aside. There will likely be a few more screws to take out and then you can lift up the face of the multimeter off of its body.
Some of these have hooks, tabs, or something else holding them together. Be careful not to break them and try to remember how everything came apart so that you can put that bad boy back together again. Once the board is visible you should see a blown up tube fuse. The fuses are usually situated right next to the ports that your banana connectors slide into. Simply lift it out of its little holder and discard the blown fuse.
Make sure you replace the fuse with the exact same fuse that is rated for the same amount of power. The metal cap on the end of the fuse should indicate what the fuse is rated for. If you use the wrong fuse and you go on measuring things, your multimeter can become permanently damaged, so it’s absolutely imperative that you replace the fuse with the exact same fuse that was in it before. Reconstruct it likes its humpy dumpty and you’re good to go! Make sure to take note on what blew that fuse so that you don’t repeat your mistakes in the future!
Signs of Quality in Multimeters
Okay, so we’ve gone over a very basic guide on how to use your multimeter, what it does, how to replace its fuse and now you’re probably wondering what multimeter to get. Before we get to the actual buyer’s guide where I recommend my favorite multimeter units and show you where to get bargain deals on them, let’s talk about quality and fancy functionality.
First and foremost, a solid clicking feel on the selector knob is a pretty good indication of quality. Many multimeters come with similar functions in a similar form factor but the way they are built can range drastically. If the knob feels like you’re trying to spin a wet noodle, I’d stay away from it and perhaps spend a few extra bucks on a more solid built unit.
A fancy feature that people who use their multimeters regularly might want to have available to them is the auto-ranging feature. This means the multimeter is capable of automatically changing their internal range to find the best range that provides the highest accuracy.
I mentioned backlit LCD displays before, but I’ll go ahead and mention them here once more. These are nice to have if, for instance, you’re working in a dark basement with very little light or you’re testing something underneath your car. In most situations, you likely won’t need a backlit display, but most of the high-end multimeters have this and it can come in clutch for you if you really happen to run into trouble in the dark!
Another thing to look out for is probe quality. We’ve discussed probes a bit earlier on in this guide and I even showed you some examples of replacement probes, however, not all probes are created equally. Just like those cheap Walmart headphones that always end up with one earbud working and one not, probes’ internal wiring can come undone and stop working. The last thing you want is a faulty probe when trying to figure out what electronic components are faulty!
Most decent multimeters nowadays come with an auto shut off function. Honestly, I’m not even sure I’d buy one without an auto shut off function unless I was really on a ramen noodle budget. Of course, you could just remember to turn off your multimeter when you’re done and you’d never have to worry about it, but accidents happen and we all forget some things from time to time. It would be a major drag to have a dead multimeter and no spare batteries lying around when you really need your meter in a pinch.
Conclusion
Although I can’t use and test every single multimeter ever made and will ever be made in the future, I can do my best to suggest the best meters in multiple price ranges on the market today. In the above review, I list my favorites in order of price, trying to find the absolute best multimeter for everyone’s budget. If I missed one of your favorites, let me know in the comments section and I’ll do my best to check it out!

Hello, my name is Chris and I was born and raised in Western Pennsylvania. I’m an engineer with experience in medical technology, steel and materials, and nuclear power industries. I have been with my current employer for more than 5 years developing digital control systems for nuclear power plants.
I’m also a homeowner with a growing range of home renovation experience. My goal is to take all my technical knowledge and first-hand experience and translate it into high-quality content to support all of your home guide needs. Whether it be step-by-step guides, technical consultation, or product reviews, my aim is to make all your home projects a great success!